Showing posts with label Chocolate. Show all posts

Jan 12, 2015

Moist Chocolate Mug Cake


               Easy recipes  have their own beauty. They are more so, for super busy moms like me. Believe it or not, this recipe was so easy that I hadn't expected it to turn out good, when I first saw it in this gorgeous blog. I had never guessed there was an easy way to make a chocolate cake; without all those whipping, beating and folding processes. And I was not so optimistic as to the outcome of a cake in the microwave, as the one time I had attempted it before had given me something like a sweet spongy dough.

            But  Julie's  words as well as her pictures tempted me enough to try it out. After all it was just a matter of 5 minutes. Amazing enough, incredible enough, so unbelievable, it turned out to be a moist soft chocolate cake, which the boys fought over. I have made it again 3 or 4 times, since the first attempt. It has become one of my latest time saver desserts. Try this out for your kids and you wouldn't be disappointed.

Moist Chocolate Mug Cake
(Recipe adapted from Table for two)

1/4 cup all purpose flour
2 tbsp unsweetened cocoa powder
1/4 tsp baking powder
3 tbsp powdered sugar
a pinch of salt
1/4 cup milk
2 tbsp veg.oil
1 tbsp Nutella

Method:

  1. In a medium bowl, whisk together all the dry ingredients.
  2. Whisk in the milk and oil and mix well until well combined and no clumps are seen.
  3. Pour batter into a micro wave safe large coffee mug.
  4. Drop 1 tablespoon of  Nutella or any other chocolate spread in the middle of the batter. No need to push it down.
  5. Microwave mug cake for 1 minute on high.
  6. Remove from microwave and serve hot or cold. Enjoy!

Jul 30, 2014

Chocolate Mousse


                 In the month of Ramadan, I was busy like a bee. Of course I missed the blogosphere, entirely. Now, I have to begin from the beginning all over again. To add to the no blogging month, here comes the next. I am going to India for a month's vacation, and blogging rarely comes in the list of priorities during this time. So yes! you would probably see the space stagnant for another month. So, In between, I thought of posting this one dessert which is in fact enough for a months duration of devouring. Yep! You would most probably make it again n again, even if your are not much of a chocolate lover.


    So, how do I explain this 'must have once in a while dessert', in simple terms?

               It is decadent, sinful
                              Obviously flavourful..
               Made to win, make u fall in love
                               Head over heels, LOL!!
               Creamy, silky, bittersweet
                               What more?It's chocolate.
               So get to work. Whip it up
                                You are gonna lick it up!

Actually I took the pictures a few months back when I had made it the third time. It was so creamy and had a 'melt in the mouth' kinda texture that the kids called it 'chocolate ice cream which was not that cold' :)
Here is the recipe...


Nov 21, 2013

Chocolate Doughnuts

               
                        " Don't wreck a sublime chocolate experience by feeling guilty. "
                                                                 ~Lora Brody


              I had been holding back on serious baking ever since the fifth member of the family came home. Or   should I say all the four members where holding me back (utilizing all my free time)? Well, but you cannot afford to be inactive for so long. Some or other events spring up in life to make you find time to do the pushed back experiments and make you more and more prone to multitasking.

              It was chocolate day in the elder one's school and I had to make something chocolaty. I asked him what he wanted and the reply was pert. Chocolate Doughnuts! Boy! Isn't it yummy? For just once, I had to forget about those warning signs like 'high carb', 'high fat' and 'junk'. Caving into pressure (or was it caving into temptation?) I decided to make a batch of simply scrumptious doughnuts topped with chocolate glaze. I adopted the recipe from here and it turned out great. The only change I made to the recipe was added a pinch of salt too.


            I preferred baking to deep frying, but unfortunately I didn't have a doughnut pan. So decided to try my luck at deep frying. It was not that easy to maintain the shapes of the doughnuts. Even after reading a lot about the technique, I was quite on the edge while frying them as many lost their exact circular shapes. I stored the distorted ones for home use and send the pretty ones to school. Needless to say, the son was all smiles when he left for school with a bunch of glazing yummy doughnuts packed securely in his bag. Usually it's hard to wake him up in the morning and while dressing up, he would find all the excuses in the world to suggest that he should bunk the classes; of which some of the popular ones are like..'he is sick of hearing the teacher's crass voice all day' or 'he is gonna miss me all the morning' :)


               So it was great to see him up like lightning, dress up with zeal and cheerfully get into the school bus with his proud accomplishment in the back pack. And I must confess that I forgot all about 'healthy eating habits' when I had all those leftover doughnuts at home. But who am I to  resist such tremendous temptations? ;) The chocolates in the fridge where all eaten up by the boys. They dig into the fridge whenever I forget to lock it, and hence there was very little chocolate left over. As I had no time for shopping, I had to make the glaze with the available chocolate. So my glaze got a little thinned out as you can see from the pictures.

Doughnut Recipe 

To make Doughnuts:
(Makes 30 standard sized Doughnuts)

4 tsp active dry yeast
1/4 cup lukewarm water
1 cup lukewarm milk
3 tbsp powdered sugar
1/4 tsp salt
100g butter, melted
4 1/2 cups all purpose flour
3 eggs
Vegetable oil for deep frying.

      Place the yeast, water,milk and 1 tbsp sugar in a bowl. Close with a lid and set aside for 10 minutes to rise.
     Sieve the flour into a wide bowl and add butter, eggs, remaining sugar and the yeast mixture into it and mix with a butter knife until a sticky dough forms.
     Bring the dough together by kneading on a lightly floured surface. Place the dough in an oiled bowl, cower with a damp cloth and set aside in a warm place for one hour or until double in size.
     Knead the dough and de airate it on a lightly floured surface for 5 minutes or until it feels smooth and elastic.
     Roll out the dough on a lightly floured surface to 1 inch thick. Cut 3 1/4 inches rounds with a cutter. You can use the mouth of a glass or cap of a jar to do it. Cut 11/4 inches rounds from the middle of it.


     Place the dough rings carefully on a tray lined with non stick baking paper, cover with a damp cloth and set aside in a warm place for 30 minutes or until risen.


     Heat oil in a saucepan over medium-low heat. Cook the doughnuts a few at a time for 1 minute on each side or until golden. For tips on how to handle the dough to retain the shapes of doughnuts please refer here.
     Drain briefly on paper towels.
To make Chocolate glaze:

   2 cups confectioners sugar/icing sugar, sifted
   1/2 cup unsalted butter
   1/4 cup whole milk, warmed
   1 tbsp light corn syrup
   2 tsp pure vanilla extract
   4 ounces( 120g)  bitter sweet chocolate, chopped

     Sift icing sugar into a small bowl through a fine mesh sieve and set aside.
     Combine butter,milk, corn syrup and vanilla in a saucepan and heat over medium heat until butter is melted.
     Decrease the heat to low, add chocolate and whisk until melted.
     Turn off heat, add the confectioners sugar and whisk until smooth.

Assembling the Doughnuts:

   Place the chocolate glaze over a bowl of warm water.
   Dip the doughnuts immediately.
   Place on wire racks to cool completely and allow the glaze to set for 30 min before serving.
   Enjoy!
     

Jan 9, 2013

Chocolate Almond Biscotti

            The cold days (and even colder nights) are here. This year the chill is creeping in very slowly ( too slowly it seems). So my son still refuses to wear his sweater while going to school and comes back cold and hungry...
            These days, the kitchen pantry need to be stocked with all kinds of eatables ranging from cookies to corn flakes. As the hunger pangs are high in the winter season, the boys come to the kitchen in search of snacks, every now and then. If you don't have goodies stocked, then you are sure to get exhausted with their constant nagging to make something for them. So I decided to make something with a longer life span than muffins, so that I could store them for future use.


             I haven't made Biscotti , before; but have been planning to make one for sometime..They are twice baked biscuits originated in Italy and has an oblong shape and are usually baked with nuts like almonds or pistachios in it. Baking twice,makes them very dry and could be stored for long periods of time. As I have hardly any time for serious baking and cooking these days, I thought it perfect to make a big batch of biscotti and store it right away for the ever hungry boys :). The fact that it is practically a no-fat version of biscuits, made it all the more appealing to me because, after all am I not the person who polishes off the boys' left over food, every time?;) So if it's a low fat version, then the better for me..


            My elder son loves both chocolate and almonds. That's simply why I selected this simple recipe of  Chocolate Almond Biscotti. The product was a little bit dry, which was expected, but the combination of chocolate and almonds was fantastic, which gave the biscotti, a bity, nutty texture.

          At last I have a big jar of biscotti waiting to be attacked by two hungry little boys...:)

The Recipe:
(makes about 20 to 24 biscotti)
(Adapted from David Lebovitz' ROOM FOR DESSERT)


Things you need:
1 3/4 cups all purpose flour
2/3 cup (135g) granulated sugar
2 large eggs
2/3 cup (110g) semi- sweet or bitter sweet chocolate chips
2/3 cup (110g) blanched whole almonds
1 tsp baking pdr
1 tsp pure vanilla extract
1/4 tsp salt

Method:


  • Preheat oven to 180 degree C (350 degree F). Toast almonds for 8 to 10 minutes or until, lightly browned and fragrant. Let it cool and then coarsely chop and set aside.
  • Line a baking sheet with parchment paper
  • In a bowl, beat the sugar and eggs on high speed until thick, pale and fluffy.(about 5 min). Beat in the vanilla extract. In a separate bowl, whisk together flour, baking powder and salt. Add the egg mixture and beat until combined. Fold in chopped almonds and chocolate chips.
  • Transfer the dough to a well floured counter and roll into a log shape, about 30cm long and 3 1/2 inches wide. Place on the baking sheet and bake for about 25 minutes or until firm to touch.Remove from oven and let cool for 10 minutes on a wire wrack.
  • Reduce oven temp to 165 degree C (325 degree F). Transfer the log to a cutting board and cut into about 1/2 inch slices, on the diagonal. Place the biscotti, cut side down, on the baking sheet. Bake for about 8 to 10 minutes, turn slices over and bake for another 8 to 10 min or until golden brown.
  • Remove from oven and let cool. Store in an air tight container.

Apr 13, 2012

Mocha Cupcakes with Chocolate Butter cream frosting

 
"Coffee makes it possible to get out of bed. Chocolate makes it worthwhile."
~Author Unknown
 
      
                       Though I like baking very much, big fat (iced) cakes tends to suffocate me. Even while thinking about the long sessions of frosting, smoothing and  decorations, my spine makes a lazy squeak and my mind tends to go suddenly numb and wary. And I frantically find excuses to leave the larger cakes for another day zeroing in on cup cakes again and again. For I have the excuses that they are easier to make   more charming and beautiful, no fuss about elaborate icing techniques and just a piped swirl or flower looks cute and stunning on them than on any other cakes. And what more, no strangulating thoughts of cutting the cake to smooth slices or how to decently serve them to your guests or kids. So there! cup cakes pop up in my oven very often and big cakes, once in a blue moon.

                     Being a great fan of coffee,I recently wondered why I didn't post any recipes with coffee in KB yet. Though I use coffee in everything from dessert to bread, the thought of posting them had queerly abandoned me!The combination of chocolate and coffee is a tempting flavour in any desserts and cakes. For those who are both chocolate and coffee lovers, there is no better option other than mocha. Add a streak of mocha sauce to your vanilla pudding and it becomes all the more vibrant and flavourful.The sweet aroma of coffee and chocolate which wafts up while the cup cakes are being baked, can never be traded with anything better.


            I make mocha muffins often, as my son loves chocolate and I love coffee. But my cupcake icings were not as good to gawk at. I recently saw a cup cake swirl tutorial ( there is a lot going on in U tube, by the way)  and tried my hand at it. I know it is not as beautiful as they did, but still it is a swirl, and Jr KB gave the verdict 'pretty'. He loved it with chocolate butter cream even better, though there were a lot more clothes with annoying streaks of chocolate cream in the laundry! Mr.KB took one with out comments and then grabbed one more soon after, which is a complement in itself as he is not a great fan of chocolate, nor is he a sweet tooth.


       Coming to the recipe..

Mocha Cupcakes with Chocolate butter cream frosting

(Makes about 3 dozen cupcakes)

Things you need:
     
                                                           For muffins:

2 large egg (at room temperature)
1/2 cup (120 ml) butter milk
1/2 cup (120 ml) vegetable or canola oil
1/4 cup (60 ml) black coffee or espresso (at room temp.)
1 tsp pure vanilla extract
1 cup (130 g) all purpose flour
3/4 cup (95 g) whole wheat flour
1/4 cup (25 g) regular, unsweetened cocoa pdr
1 cup (205g) light brown sugar
1/2 tsp baking pdr
1/2 tsp baking soda
1/4 tsp salt

For frosting:

1/2 cup unsalted butter or margarine, at room temperature
1/4 cup cocoa powder, or 2 ounce semi sweet chocolate squares, melted
1/2 tsp pure vanilla extract
2 cups sifted confectioners sugar
1& 1/2 to 2 tbsp milk

Method:

       Preheat oven to 190 degree C (375 degree F). Place the rack in center of oven and line 2 muffin trays with paper liners.
       In a large bowl , beat the eggs and sugar until creamy and pale.Beat in the butter milk, oil, coffee and vanilla extract.
      In another bowl, whisk together flours,cocoa powder, baking pdr, baking soda and salt.
      With a rubber spatula, fold the dry ingredients into the wet ingredients, and stir only until combined. Do not over mix or beat with a whisk.
      Evenly fill the muffin cups with the batter and bake for 18 to 25 minutes or when a skewer inserted into the center comes out clean. Transfer to a wire wrack and let cool for 5 to 10 min, before removing from pan.

Chocolate Butter cream frosting:

 In a bowl cream the butter or margarine with a whisk until smooth. Add cocoa and vanilla extract. Gradually add confectioners sugar, one cup at a time, beating well on medium speed. Scrape the sides and bottom of the bowl, often. The icing will now appear dry. Add milk and continue beating at medium speed until light and fluffy.
      Fill it to piping bag and squeeze swirls or rosettes over cooled cup cakes. If you are not using the icing immediately, refrigerate it in an air tight container. It can be stored up to two weeks in the refrigerator. Re whip on low speed before using.

Mar 28, 2012

Chocolate chip Cookies

"A balanced diet is a cookie in each hand." 
~Author Unknown


                   Cookies have been used as pacifiers in my place. Pacifier for bigger kids... Pacifier for toddlers. Whenever the pestering get troublesome, it gets handy. In fact just like soother for an infant. Nowadays bawling for very trivial matters( that's what I think) have become fashionable here, at least in my household.

"Wooh!! my cycle got stuck"

"I just can't write 'A' like mom does. Baa!!"

When the plank of patience threatens to give way, I start shouting...

"Is that a big deal? Why do you start crying for such silly things?"

 and the weeping gets out of control .

"I feel horrible coz mom scolded me.."

"I didn't scold you. I was just asking you why you are bawling all the time."


And I change the tactics.

"Do you want cookies?"

"What cookies?"

"Chocolate chip, which I made yesterday?"

And suddenly the face lights up a 100 volt. Sometimes I have seen a cloudy dark sky suddenly clears and the sun shines on it bright...

More often the 'soap operas' end with either of the two promises. Chocolate or Cookies. That is the reason why I like to call it a pacifier rather than a cookie.


And Chocolate chip cookies satisfies both his cravings for chocolate as well as cookies.
This is the recipe from Crisco can, which I tweaked little bit and have made many times and always turns out good for me.
Coming to the recipe..

Chocolate chip Cookie Recipe:


(Makes about 20 cookies)

Things you need:


2/3 cup firmly packed light brown sugar, powdered
1 and 1/2 sticks (150g) butter or butter flavored veg.shortening
1 tbsp milk
1 tsp vanilla extract
1 medium sized egg
1 cup all purpose flour
1/4 tsp salt
1/2 tsp baking powder
1 cup semi-sweet chocolate chips

Method:


      Preheat oven to 375 degree F or 160 degree C . Combine  brown sugar and butter in a large bowl and beat with an electric beater until light and fluffy. Add the milk and vanilla and beat well. Beat the egg into the creamed mixture.
      Whisk together flour,salt and baking powder and fold into the creamed mixture until just combined.Stir in the chocolate chips.
      Drop rounded tablespoonfuls of dough 3 inches apart onto ungreased baking sheet. Wet your hands and roll them to balls if necessary.
      Bake for up to 10 minutes for chewy cookies, or 11 to 13 minutes for crisp cookies. Cool 2 minutes on the baking sheet and then transfer them to a wire wrack to cool completely. Use immediately or store in an air tight container.


Feb 23, 2012

Walnut Chocolate Brownie

"Forget love - I'd rather fall in chocolate! "
~ Sandra J. Dykes


                    The look of a brownie had never appealed to me. All cracked and uneven, it was an ugly duckling. And so I hadn't took pains to make one and never bothered to find a recipe until I had these bitter sweet chocolate brownies from a nearby confectionery. What shall I say? They just took my breath away... Just melted in the mouth as they said and before I knew what hit me, I already had three in my tummy. So decided it was time to google some recipes...


                    Dived into the fridge for provisions and out came them one by one. Butter, chocolate, eggs and at last there was none. Melted chocolate and butter and in went sugar and flour, and the batter was ready with walnuts in less than half an hour. Started baking in zeal with a tune on my tongue and a swing on my toes..

                   Everything went on like breeze, until the chocolate nut in the house appeared from nowhere and demanded  he want chocolate for definitely he can smell one. Informed him it is being baked in the oven, but nevertheless he wanted then. So couldn't wait for thirty minutes before it was cooled and half of them went to a tiny tummy.. a tummy which loves chocolate. Fingers licked, lips smacked, and surely the brownies rocked.


Walnut Chocolate Brownie Recipe

Things you need:

150g semisweet or bitter sweet chocolate chopped
113g (1 stick) unsalted butter, cut into pieces
2 tbsp cocoa powder
1 cup powdered white sugar
1 tsp pure vanilla extract
3 large eggs
3/4 cup all purpose flour
1/4 tsp salt
250g walnuts, chopped

 Method:

          Preheat the oven to 350 degree F or 180 degree C and place the rack in the centre of the oven. Butter the baking pan and line it with parchment paper or wax paper leaving an overhanging on two opposite sides.
          Melt the chocolate and butter in a large stainless steel bowl placed on a sauce pan of barely simmering water. Stir from time to time with a rubber spatula, until the butter and chocolate is completely melted.   
          Remove from heat and add sugar. Whisk in the vanilla extract. Now add the eggs one at a time and beat with a wooden spoon for 15 to 20 strokes.  Finally stir in the flours, salt and walnuts.
         Transfer it to the baking tin and level the surface with the help of the spatula. Bake on the centre rack for about 30 minutes or until a tester inserted at the center comes out moist with a little crumps. Do not over bake. Remove from oven and let it sit for 5 minutes.
         Now carefully transfer it to a cutting board by holding the two over hanging parchments. Let it cool for at least 20 minutes before cutting to square pieces with a knife (which is the toughest part).Sprinkle with icing sugar.Serve!

I am sending this recipe to 'Love n Chocolate Fest' at Vimitha Anand's 'My Culinary Trial Room'.

              and Let's cook Sweet somethings at Tickling palates

Dec 8, 2011

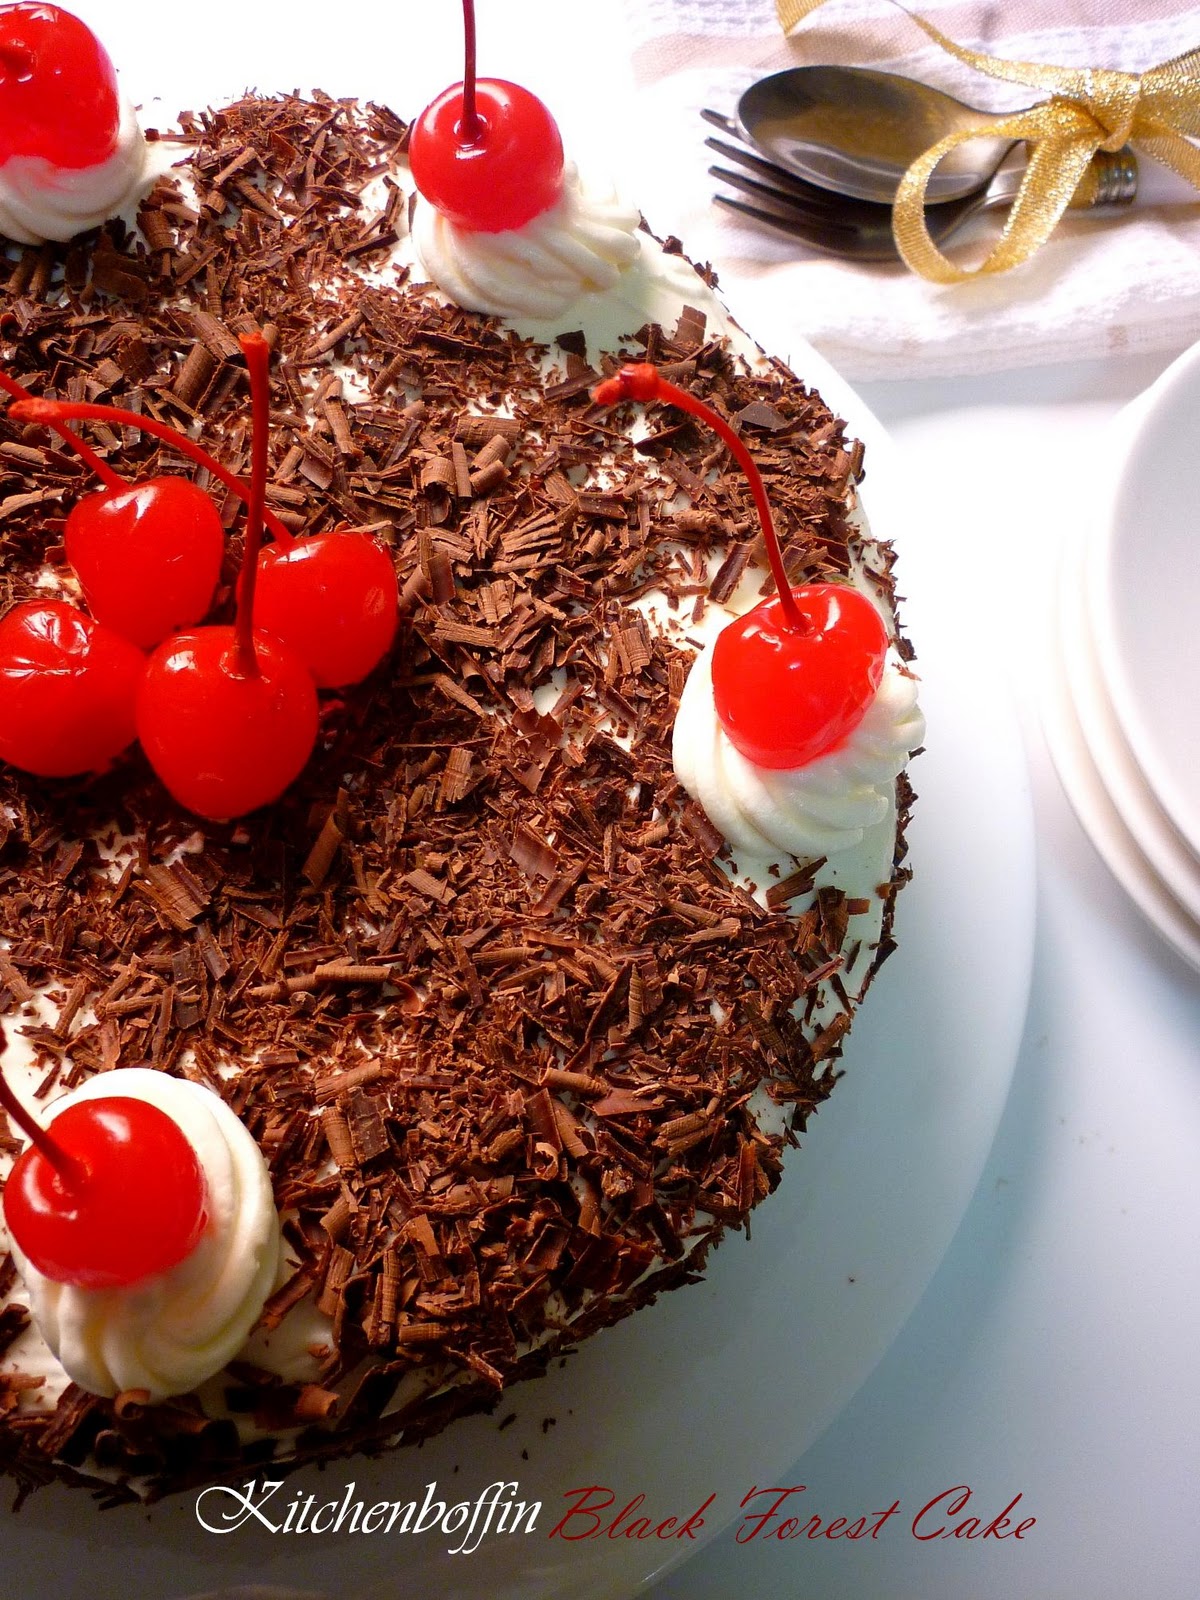
Black Forest Cake


           This is one of my favourite cakes and one I have been planning to make for ages. I just couldn’t gather enough time to bake the cake and go with the long process of frosting, assembling and decoration. So it was procrastinated for days, weeks and months. Now that it is done, though with a few pitfalls, I feel so much rewarded. It was definitely a long process. Phew! Looking at the finished cake I feel as content as at seeing my younger son smile. He has just turned three months and has started smiling.. He lights the entire home with the mere curve of his mouth... :)

                The original recipe of the Black forest cake or Gateau evolved from Germany in the 1915. It was invented by Joseph Keller. Typically it consists of several layers of chocolate cake with whipped cream and cherries between each layer. These layers are topped with additional whipped cream, maraschino cherries and chocolate shavings. Traditionally the cake is saturated with Kirschwasser (cherry brandy). I needed an alcohol free version and did the sprinkling with the syrup of canned maraschino cherries and it tasted just fine. As the entire process is a bit time consuming, it is wiser to split the process between two days… say, bake the cake, do the filling and assembling the first day... make the chocolate shavings and go with the frosting and decoration the next day. Otherwise you are sure to get pissed off by the end of the day. I have been there and I must warn you it was quite tedious.


                      If you are planning to make a cake of four layers here is an option. Bake two cakes and cut them horizontally with a serrated knife or using a thread. Then assemble it one by one over the other. Or if you are making a cake of three layers bake a cake with the given recipe and bake another using half the quantity of ingredients. Now split the first cake as said earlier and assemble them one over the other followed by the other thinner cake. I must confess that I made only two layers to my cake as I was too lazy to bake two cakes ;) To make the frosting and filling double whipped cream is just fine.  For the chocolate shavings you can use any kind of chocolate according to your taste but it is better to use dark chocolate around 60 to 70 percent dark, to get the real dark color. Dark chocolate is bitter to taste but you hardly notice it as you are going to eat it with the whipped cream which is sweet.


This recipe is basically an eggless recipe which uses condenced milk and noo.. eggs! Now, doesn't that make it more desirable to gobble?

Black Forest Cake Recipe
 Things you need:

Sweetened condensed milk - 400g

Softened butter - 100g

All purpose flour - 175g (1 ¾ cup)

Coco powder - 25g (3 to 4 heaped tbsp)

Baking powder - 1tsp

Soda bicarbonate - 1/2  tsp

Vanilla essence - 1 tsp

Aerated soda - 1 cup (150 ml)

For soaking and filling:

Cherry syrup - 20 ml

Whipped cream - 200g

Glazed cherries - 50g

For icing:

Maraschino cherries, drained - 100g

Whipped cream - 200g

Black chocolate (60 to 70 percent) -50 g

Method:


  • Preheat the oven to 180 C.
  •  Grease an 8 inch diameter cake tin with butter. Dust with flour and keep aside.
  • Sieve together the flour, coco powder, baking powder and baking soda into a bowl and keep aside.It is better to seive the flour at least three times. This is to aerate the flour to help form a light spongy cake.
  • To prepare the cake batter, add sweetened condensed milk to a bowl containing softened butter. Beat the two together thoroughly. Add vanilla essence to the mixture.
  • Add 2 to 3 tablespoons of flour mixture while beating continuously in low speed. Add some of the aerated soda while beating. Keep adding the flour mixture and aerated soda alternately to get a batter of smooth consistency. Do not over beat.Over beating results in a heavy cake rather than a soft and fluffy sponge.
  • Once the batter is ready, pour it into the prepared baking tin immediately. Bake it in the pre heated oven at 180 C for 35 to 40 min or till the cake is done. Remove the cake from the oven and loosen the cake sides using a knife. Keep for 5 minutes and turn the cake upside down on a wire wrack. Allow the cake to cool down.
  • Now cut the cake horizontally into two halves with a serrated knife or thread. Drain the cherries’ syrup into a bowl and brush the cake halves with the syrup. Take care not to over soak the cake or it will become soggy.
  • Whip the cream into the desired consistency or until it forms peeks.
  • Make the chocolate shavings by sliding the side of the chocolate bar on a vegetable slicer or vegetable peeler or with a knife. Make sure the chocolate is at room temperature to do this. Take care not to touch the chocolate shavings with your hands as it would melt. You can make the chocolate shavings before hand and store it in the refrigerator.
  • Place the whipped cream over one of the cake halves and top it with sliced cherries. Place the other cake half on top of it to sandwich the cream and cherries. Top with whipped cream. Cover the sides of the cake with the cream. Then sprinkle the chocolate shavings over the sides using a spoon. Then sprinkle it on top of the cake. Transfer the remaining whipped cream into an icing bag and pipe it onto the edges of the cake through a star nozzle to form rosettes. Decorate the cherries on top of the rosettes. Refrigerate covered for at least two hours. Serve after chilling.
  • The cake tastes best if you eat it after keeping for two days for the cake to absorb the cherry flavour.

LinkWithin

Related Posts Plugin for WordPress, Blogger...