May 31, 2012

Fish curry with Coconut milk


          If there is one thing that Mr. KB would have, again and again without getting sick of it, it is the Spicy fish curry. When I am about to serve lunch, he would ask,"What's the curry?" and when I name the usual vegetable curries I prepare, he would show a "Well, bring it on. I don't mind" kind of attitude. No particular interests nor any exuberant joy. But when it is the fish curry, I see a quaint twinkle in his eyes and a sense of decadent zeal.


            Mr. KB is a man of inhibitions, unlike me who goes really weak on the knees in front of delicious food. He never fly over the top, even if he is enjoying his favourite food. So it was unlike him to pour curry into his plate and lick it with fingers even after he had done with the rice; which is what happened the other day when I prepared the fish curry."Great! Great! So much for inhibitions" I thought. Anyway it is amusing to see that you can bring out the 'barbarism' in people with your food sometimes.

            I used gamboge (Kudampuli) in this fish curry. Gamboge is rarely used in fish curries in the northern Kerala side, but in the south, it is very common. So I have a suspicion that this is a Southern Kerala fish curry though my mom makes it often, the source from which she got the recipe is unknown to me. Another speciality is the addition of thick coconut milk which mellows the fierceful flavour to some extend. In my mom's words,"The quality of the coconut milk determines the taste of the curry". So go for very thick and undiluted coconut milk for better results.

             And of course, the clay pot; which is inevitable for that great flavour. There is more than just flavour to using an earthen pot. The acidity of the gamboge or tamarind which is almost always used in Kerala fish curries may react with the vessel in which the curry is prepared and stored if a metal pot is used. Cooking it in a clay pot (earthen pot) helps to avoid this situation, thus making it more healthier. That must be the reason why fish curry in Kerala is inevitably prepared in clay pots. I am so obsessed with my clay pot, which my mom send from Kerala a few years back, that I would trade anything for it. If you are a more fierce fully spice tolerant kind of person, try my 'fish curry without coconut milk' (meen mulakittathu) which I posted earlier.


Fish curry with Coconut milk:

1/2 kg fresh pomfret or any other fish with thick flesh, cut into pieces

8 to 10 shallots, sliced
2 to 3 cloves of garlic, sliced
a small piece of ginger, sliced into thin pieces
1/2 tsp of turmeric powder
2-3 tbsp of red chilli powder/ kashmiri chilli powder if you are on the low spice level
2 tsp of coriander pdr
2 bells of gambooge or 'kudampuli'
1 1/2 cups of water
1 1/2cup of thick coconut milk
Salt to taste
1 tbsp veg.oil

For tempering:

1 tbsp of coconut oil
a sprig of curry leaves.

Method:

Heat an earthen pot and add vegetable oil. Add shallots, garlic and ginger when the oil is hot. Saute for a few minutes. Now add the turmeric powder, red chilli powder and coriander powder and saute in low heat for a few minutes. Add water to this and increase the heat. When it comes to a boil, add salt and gamboge. Then add the fish slices and cook covered in medium heat for ten minutes or until done. When the fish is well cooked, add the coconut milk. When the mixture starts to boil, remove from heat and pour coconut oil on top. Garnish with curry leaves and serve hot. It goes well with rice, appam, puttu and parottas.
       
       This post also goes to the Kerala Kitchen Event created by Ria and Rose of The Kerala Kitchen, being hosted by Jehanne of the cookingdoctor.

May 28, 2012

Mango Lassi


         Another nourishing, soothing and cooling drink for the hot weather. Lassi is a drink made with yogurt and sugar and you can add any kind of fruits or spices to it according to your taste to make different Lassis. The sweet and sour combination is a twist to the ordinary milkshakes. Here I have prepared it using ripe seasonal mangoes and yogurt. A healthy and nourishing drink, rich in vitamins, good for children and adults alike. The addition of ginger juice make it more digestive and flavourful. Enjoy this delicious drink garnished with a sprinkle of cinnamon or cardamom powder.


Mango Lassi Recipe

Things you need:
(Yields about 3 cups)

2 ripe medium sized mangoes
1 cup yogurt
1 cup ice cubes
Sugar/ honey, to taste
2 tbsp fresh Ginger juice (optional)
Powdered cardamom/ cinnamon, for garnish

Method:
  1. Peel, cut and cube the mangoes. Use mangoes with less fibre for best results.
  2. Blend the mango cubes and yogurt in a blender. Add sugar, ice cubes and Ginger juice to it and blend to a smooth consistency.
  3. Pour into glasses and garnish with powdered cardamom or cinnamon. Serve immediately.

May 25, 2012

Strawberry macarons


          It  has been a while since I made macarons. I have been planning to include strawberries in my macs ever since the strawberry season started but every time my strawberries got finished before I got a chance to incorporate it in a mac as my son loves nibbling them on as it is. This time, I managed to get the strawberry box hidden behind a bunch of lettuce in my fridge, which he hates, and started making the macarons when he was fast asleep.

           As a child, I was not much fond of strawberries. I always associated it with the multivitamin tonic, mom used to give us when we were small, which I hated. It had the strawberry flavour. So when ever, I got candies or ice creams with strawberry flavour, I used to reject it saying it has 'tonic flavour'. As I have never given any tonics to my kid with strawberry flavour, he still loves strawberries and anything made with them.


          I hadn't much time to blanch the almonds and all; so I powdered the almonds with the skin on. There was not much difference other than the specky shells which I find is adorable, which would otherwise have been plain white. Mashed a few strawberries in the mortar for the strawberry butter cream filling, but decided to leave the shells plain, not colouring or flavouring them. Too much flavour in macarons (according to me) is not good as I think it overpowers the real macaron flavour of almond and sugar.


Strawberry Macaron Recipe

Things you need:

For the Macaron shells:

65 g ground almonds
100 g icing sugar
50 g aged egg whites (about two egg whites)
25g granulated sugar
Pinch of salt

For the strawberry butter cream filling:
(yields 1 cup)

1/2 cup unsalted butter or margarine,at room temperature
Sifted confectioners sugar, to taste( about 1 cup)
1 to 2 tbsp milk
1/4 tsp pure vanilla extract
3 tbsp Strawberries, hulled and mashed


Method:
For the shells:
1. Firstly age the egg whites: Place egg whites in a clean bowl and cover lightly with a kitchen towel or tissue paper. It should not have any streaks of yolk in it. Keep it in your kitchen counter for 24 to 48 hours or up to 5 days in the fridge. Aging egg whites help to reduce its water content which is turn makes firmer shells for cookies.

2.Pulse the almond powder and icing sugar in the food processor or blender until fine and sift it into a large bowl to break lumps and aerate it. Discard any lumps or almond pieces. Keep it aside.
3.Whisk egg whites in a clean stainless steel bowl with no traces of fat in it, using an electric beater(medium speed) adding a pinch of salt.When the egg whites become foamy( like bubble bath) start adding granulated sugar slowly and beat on high until stiff glossy peaks.
4.Fold in the dry mixture to the meringue( beaten egg white) in two batches,quickly with a flexible spatula until well combined and no dry mixture is visible in the batter (it takes about 50 to 55 folds).At this stage your batter should be smooth, thick and shiny which slowly and ruggedly drips off your spatula as a ribbon when you lift it. Do not over mix once you have reached that thick batter stage.

5.Line your baking sheet with baking paper or parchment paper. Fit your piping bag with a round tip nozzle, clamp the bag with a cloth peg or clip just above the nozzle and scoop the batter into the piping bag keeping it in a tall glass to help with the filling. Now remove any air bubbles in the batter by squeezing it towards the nozzle by keeping the icing bag on a flat surface. Twist the ends and remove the cloth peg. Pipe out small rounds of about 2 and 1/2 cm diameter on to the baking paper leaving two inches in between them. Rap the baking sheet on a flat surface, a few times to flatten the batter and to remove any air bubbles, trapped in.


6.Let the batter sit to dry as long as it leaves no indentation once touched, lightly. DO NOT keep it too long to dry.This resting time vary from place to place depending on weather and humidity. It may take from 10 minutes to 2 hours.

7.Preheat the oven (conventional) to 160 degree C. While keeping the baking sheet, reduce the temperature to 140 degree C and keep the oven door slightly ajar with a wooden spoon while baking. In fan forced convection oven, preheat to 180 degreeC and then reduce to 160 degree while baking and bake the macarons for 15 to 20 minutes until completely done.

8.Take them out and let cool on a wire wrack along with baking paper for 15 to 20 minutes. Peel them out carefully with an offset spatula and sort them out with same size shells. Fill them with filling and keep in fridge to mature for a day or two for the flavours to blend. Unfilled shells can be frozen.


Note: To get a general idea about macaronage technique and points to note while baking macarons, read my post, Finding feet on French macarons posted a little while back..


For the filling:

    In a bowl, beat the softened butter until creamy and pale. Gradually add confectioners sugar, little by little and beat well on medium speed. Scrape sides and bottom of the bowl. The cream will appear crumbly and dry now. Add milk and continue beating at medium speed until light and fluffy. Finally add the mashed strawberries and mix well. Use immediately or store in a sealed container in the refrigerator until ready to use. Re whip on low before using, if the butter cream is refrigerated.

May 21, 2012

Nadan Beef Varattu / Malabar Beef Roast

                     
                   This is a dish which has been renowned as the favourite of many in family. Mr.KB becomes exuberant and verbose while talking about this beef roast. Nostalgic and alluring, it has only drawn fans to it, the bygone years even beyond the Malabar area. It is one of those traditional tastes which hang on your tongue for so long.. It has such an outstanding influence on my culinary conscience that I often find it difficult to think of any other recipes when ever I get a pound of fresh Indian beef. Call me an old fashioned snob, my mind always refuse to believe that any other recipe could be more yummier. And more often, I end up making the same beef roast again and again.


                     Pardon me for the photos (I know,they sucks). By the time I got organised, the sun had gone and it was already twilight. And to top up the mess, my younger son was screaming crying in his top gear. So I couldn't go for elaborate photos and just took a few quick snaps. I have always forgot to take the pictures of this dish when ever I have prepared it. This time I was keen on taking it, but you see the situation snapped.

Nadan Beef Varattu/Malabar Beef Roast

Things you need:

1/2 kg Indian beef , cut into small cubes
7 to 10 shallots/ cheriyulli, sliced
1 tsp ground ginger
1 tsp ground garlic
1/2 tsp turmeric powder
1 tsp ground red chillis
1 tsp ground black pepper
2 tbsp coriander powder
1/2 tsp fennel seeds/perum jeera
1/4 tsp fenugreek seeds
Salt to taste

For seasoning:

2 to 3 shallots, sliced
1 sprig of curry leaves
1 tbsp coconut oil

Method:
  1. Cook the beef with little water and all the other ingredients (except that for seasoning) in a pressure cooker, until well cooked ( about half hour) in medium heat.
  2. Heat oil in a wok and add the shallots. When it becomes brown and aromatic,add curry leaves. Add the cooked beef into it and saute in medium to high heat, stirring continuously until the gravy dries up and the beef is coated.
  3. Remove from heat and serve hot with rice, pathiri or chappatis( Indian flat bread)
This post  goes to the Kerala Kitchen Event created by Ria and Rose of The Kerala Kitchen, being hosted by Jehanne of the cookingdoctor.


May 14, 2012

Water melon Sorbet


          I got to get myself something cool and refreshing to get me going in this hot weather. It has not been long since I praised the warm weather and welcomed it after the daunting winter... but it has started to jab my nerves sooner than I imagined. What deteriorates the situation more is the fact that I am a lousy water drinker. Since I seldom feel thirst, even in the hottest weather (or not at all), I often forget to have a cup of pure water now and then. And I had to pay for my carelessness last week as I was down with UTI. The pain on my flanks was killing me to the extend that I prayed, I would drink a barrel of water every day if I was spared of this avalanche of  pain. When my home remedies didn't find light and the infection began to climb up, I was put on antibiotics, a thing I have always avoided like plague.

          So after a long week of fighting UTI, I started taking at least three litres of water a day and turned my head to all the cooling and rejuvenating smoothies, sorbets and milk shakes. It is water melon season again and I cannot find a better fruit to beat the heat and hydrate your body. Eating it as such, cutting it into wedges, is my son's favourite. This time I thought of making sorbets with it. Oh boy! Wasn't it cold cool? It literally chills your soul (with out freezing it). Try this once, and you will think about it when ever the sun shines brighter... :)


Water melon Sorbet

Things you need:

(serves four)


• 1/2 cup white sugar

• 750g watermelon, peeled, seeded and chopped

• 1/4 cup lemon juice

• 2 egg whites, lightly whisked

Method

1. Combine sugar and 1 cup warm water in a saucepan over medium heat. Cook,stirring, for 5 minutes or until sugar is dissolved. Simmer for 10 minutes or until mixture thickens slightly. Remove from heat. Cool completely.

2. Place watermelon in a food processor or blender. Process until smooth. Add sugar mixture and lime juice. Stir to combine. Pour into a shallow pan. Cover and freeze for 1 to 2 hours or until almost firm.

3. Transfer fruit mixture to a food processor. Add egg whites. Process until smooth but not melted. Pour mixture into a deeper loaf pan. Cover and freeze for 3 hours or until firm.  Scoop into ice cream bowls and serve immediately garnished with mint leaves. Enjoy and beat the heat :)

Sending this to Bon Vivant #4- Fruit Recipes at Sumee's Culinary Bites

May 10, 2012

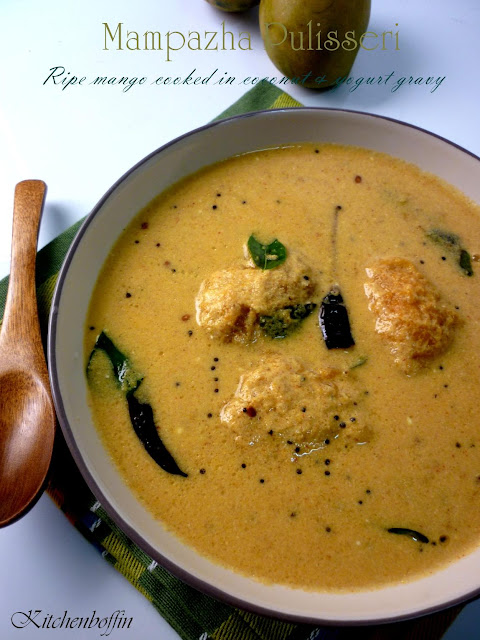
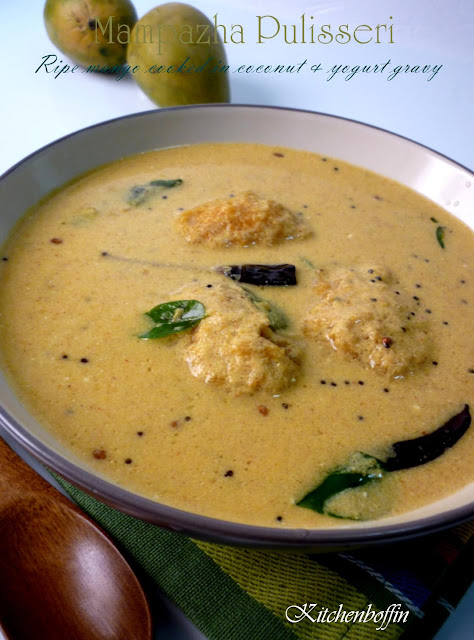
Mampazha Pulisseri

         Some things never seize to charm you even if you have gone a long way from it. Even while living in very different situations or in an entirely different world they tempt you and churns you in a pool of utter longing. When talking about traditions, homeland, cultures and cuisines to which you were born into, the condition is no different. Being a Keralite I often get such pangs in my heart and longings to get near to my motherland, while living far away from it.


         Those longings to feel the breeze around your ancestral home, to smell the fragrance of those jasmines which grew in your mother's courtyard, to walk in utmost tranquility listening to the chirping of the local birds, to feel the coolness of monsoon as it hits your eyebrows and drips down your face, to inhale the smell of the soil as monsoon hits it for the first time... and of course biting into those exquisite tastes of home, as if there is no tomorrow...

         I know I am not alone in this guttural craving for mother land. I have seen lot of Keralites in the air port with baggages as big as a warehouse stock on their pursuit to 'take their home land' to where they live. I have often seen officers smiling at seeing the most unusual things in baggages like large earthen pots to huge jack fruits and yes, coconuts too. It some times end up in making the poor man or woman, untie and display the strange belongings of those baggages in front of everybody concerned, due to suspicion of bombs. It has often reminded me of the ants with a block of sugar (more than double their size) on their back struggling to reach their far away nests.

             So, it is mango season again. The time of the year when every mango tree in Kerala is abloom with a thousand mangoes and every urchin is busy climbing mango trees and eating as many mangoes their little tummies can have. If only I could go back to my carefree childhood of climbing mango trees and jump from them screaming when the 'puliyurumbu'(wild ants) start to crawl over you... Sigh!  This is the season when the homes smell of all the varieties  of mango dishes under the sun. But we seldom made Mampazha pilissery (made with ripe mangoes) at home. I was introduced to this lip smacking dish by one of my friends' mom. Later I used to have it from our hostel on every Wednesdays. It was the only day of tthe week, I ate rice with great relish and hunger.


         We get Kerala mangoes here from a local Indian supermarket. Last week we got  some ripe 'moovandan manga' (local Kerala mango) and I made mampazha pulisseri with it. My family enjoyed it so much that I thought I would share the recipe of this incredibly yummy, sweet and tangy curry.

Mampazha Pulisseri / Ripe mangoes cooked in coconut and yogurt gravy

Things you need:

3 ripe mangoes ( preferably local Kerala mangoes), skin removed
1/2 tsp turmeric powder
1 tsp red chilli powder
1and 1/2 cups thick yogurt
For grinding:
3/4 cup grated coconut
2 to 3 shallots
1/4 tsp cumin seeds/jeera
1/4 cup water
For tempering:
1 tbsp coconut oil
1/4 tsp mustard seeds
1/4 tsp fenugreek seeds/ uluva
1 or 2 dry red chillies
a sprig of curry leaves

Method:
 
1) Cook the mangoes in adequate  water with salt, turmeric powder and red chilli powder until soft.


2) Grind the coconut, cumin and shallots with water and add this to the cooked mangoes and mix gently.Allow to cook for a couple of minutes in low flame.

3) Blend yogurt with 1/4 cup of water and add this to the curry in low heat. Add adequate salt and remove from heat.

4) Heat oil in a pan. Splutter mustard seeds. Saute the fenugreek seeds, dry red chillies and curry leaves in it. Pour this seasoning over the curry and mix gently.

5) Serve hot with plain rice.

May 6, 2012

Carrot Cake


                 I had made a small carrot cake last week  and  it got polished off pretty fast. So I am planning to make another one (this time bigger) so that I can take it to my friends' place too.
               Last week we had guests. Mr.KB had some of his friends coming over for tea and one of them, I was told, hates anything with chocolate. And we had done with a lot of fritters and fingerfoods that week. So Iwas not in a mood to make anything fried. Baking was the preferable option which looked out. Thought of making brownies. That was when the 'no chocolate' bell rang in my head. So what should I bake then? I had been planning to make carrot cake for a while and had a bunch of fresh and juicy carrots resting in peace in my refrigerator too. They were taken out from their undisturbed abode and transformed into carrot grates to make the subject of talk yummy.


           I was a little apprehensive as to how it may taste. A cake that tasted like a bunch of cooked carrots was definitely a No No. I even pictured Mr.KB's friend telling him with a grimace that he preferred chocolate to vegetable cakes. Had a mind to throw in some nuts, but decided otherwise later. Fingers crossed, I waited for the cake to rise and get done.. and my nose flared to pick even the slightest hint of that 'cooked vegetable smell' which may erupt from the oven. What reached my nostrils instead was cinnamon and something sweet. So, I don't have to worry about the smell of the cake at least. That was a relief!

          Now, for the taste. I got some bits and flakes to taste as I levelled the base of the cake with my serrated knife. Wow! not at all carroty! I resisted the temptation to dig in as I was planing to serve it whole, without disturbing the shape. Didn't have time for frosting. So decided on sprinkles of icing sugar. Garnished the top with carrot slices passed through my design slicer and took it to the tea table and the rest is history.. :)

Carrot Cake Recipe

Things you need:

(To make a small cake enough for 5 to 6 persons)

1 cup all purpose flour
1 1/4 cups(120g) grated carrots
2 large eggs
3/4 cup (150g) powdered sugar
1/2 cup (120ml) veg.oil/canola oil
1/2 tsp baking powder
1/4 tsp baking soda
1/2 tsp ground cinnamon
1/2 tsp vanilla essence
1/4 tsp salt

Method:

  1. Preheat oven to 180 degreeC (350 degree F) and place rack in center of the oven. Butter a medium cake pan and line the bottom with parchment paper.
  2. Peel and finely grate the carrots. In a separate bowl, whisk together the flour, baking powder, baking soda, salt and ground cinnamon.
  3. In a bowl, beat the eggs until frothy (about 1 minute). Gradually add the sugar and beat until the batter is thick and light coloured (abt 3-4 min). Add the oil in a steady stream and then beat in the vanilla extract. Now fold in the flour mixture and grated carrots with a rubber spatula until just combined.
  4. Transfer the batter to the lined baking pan and bake for 45 minutes to 1 hr at 180 degree C.
  5. Remove from oven when done or when a skewer inserted into the center come out with out crumps and let cool on a wire rack. After about 5 to 10 minutes, invert the cake carefully onto the wire wrack and cool completely.
  6. Serve sliced with sprinkles of icing sugar and carrot slices. Enjoy!

May 1, 2012

Jeeraka Kozhi / Jeera Chicken


                Some dishes had been reserved for special occasions, back home. Such dishes doesn't come in every day lunch and dinner. They just seem sort of detached from the normal world of goodies and always reminds of those special occasions when they would be served. But the time has changed and we are privileged to have any dishes we like at any times we wish at any time of the year.

                 Food and drinks after child birth had been (and still is) so different from normal in my home land. The woman who gave birth to a baby was treated with much care and attention. Right from what she wears to what she eats was decided by Ayurveda (the Indian system of medicine) and age old theories of older people of wisdom. Right from drinking the 'Kashaya' (medicinal decoction) early in the morning to the glass of warm milk before going to bed, was all part of the routine. So why am I telling you all these things? Well, to explain the background of this particular dish, Jeeraka Kozhi which was of course prepared specially for the new mother on her days after child birth.

                 So why was this dish selected for that special occasion? Because it helps enhance the digestive fire (agni) which is said to be in a decreased state after child birth ( Ayurveda says 80 percent of the diseases occurs due to a fault in the 'jataragni' or digestive fire) and facilitates lactation. The main ingredient, cumin in this dish is both carminative as well as lactogenic. The other main ingredient, black pepper helps enhance the digestion. It was mostly made with organic chicken bought from local farms.


              So you must have pictured this dish by now, as something which is a torture to the taste buds and tastes just like the nauseating 'kashaya' and something which the normal people decline to eat...  Not at all! If you try this once, you will be hooked to the very different and vibrant flavour, enough to tempt you to try it again and again. Let me know, if you are not :)
              I have even a suspicion that the older generation women got pregnant sooner and frequently just to relish this lip smacking preparation after delivery to their fill...(just a guess you know ;) ) As for me, I don't wait to get pregnant, to make this rich and spicy chicken again and again :) It comes often into our dinner table to go with rice and chapattis with out explainable reasons..

Jeeraka Kozhi / Jeera Chicken Recipe

Things you need:

1 small chicken , preferably organic chicken/nadan kozhi( 600 to 700g)
2-3 tbsp cumin seeds / cheriya jeera
2 tsp black pepper
7 to 8 shallots/cheriyulli, skinned
2 to 3 garlic cloves
A small piece of ginger
1 green chilli, split lengthwise
1 large tomato, sliced to medium pieces.
1/4 tsp turmeric powder
2 tbsp coriander powder

For seasoning:

2 shallots, sliced
1 sprig of curry leaves
1 tbsp Coconut oil


Method:
  • Skin and cut the chicken to small pieces. Wash and drain.
  • Grind the black pepper and the cumin seeds in a mixer until fine. Add the shallots, garlic  and ginger and pulse until a coarse paste is formed.
  • Transfer the chicken to an earthen pot and add the spice paste. Add turmeric powder, coriander powder, green chilli , tomato and salt. Mix well and cook covered in medium heat adding little water. Stir occasionally to avoid sticking to the bottom of the pot. When well cooked and tender remove from heat and temper with seasoning.
  • For seasoning heat a pan and add coconut oil. Fry shallots in it until brown. Add curry leaves and immediately pour this seasoning over the cooked chicken. Serve hot with rice or rotti.
Linking this to Heart & Soul, Teusday Blog Hop co-hosted by Swathi of Zesty South Indian Kitchen

LinkWithin

Related Posts Plugin for WordPress, Blogger...